Mining Guide
Installing VM
1. Install VirtualBox (another virtualization software can be used, but only VirtualBox has been tested):
https://www.virtualbox.org/wiki/Downloads
Guest OS is Ubuntu 18.04, x64
Download ISO image
2. Open VirtualBox, create new Virtual Machine
Select menu “Machine -> New”, Enter name, Select “Linux” (Type), Select “Ubuntu (64-bit)” (Version):
3. Select at least 2Gb RAM for the Virtual Machine.
It is recommended to arrange 2Gb RAM per CPU core for faster build.
4. Create new Virtual Hard Disk:
Select “VDI (VirtualBox Disk Image), Dynamically Allocated, Adjust file location (if needed) and select size appropriately. If you set it as e.g. 100Gb it doesn’t mean 100Gb will be allocated immediately – this is just upper limit.
5. Mount installation ISO:
Select your VM in the list, click “Settings”, select “Storage” and mount downloaded ISO as a new optical drive to IDE controller
6. Start VM and install the OS:
Follow the steps: https://tutorials.ubuntu.com/tutorial/tutorial-install-ubuntu-desktop#2
Installing the network node and CLI wallet
1. Install git (if not installed already):
2. Clone Graft Network from GitHub repository:
https://github.com/graft-project/GraftNetwork.git
3. Go to GraftNetwork directory:
4. Install dependencies from the list https://github.com/graft-project/GraftNetwork#dependencies
Use the following command line:
5. Start the build:
Option A (Use all CPUs):
Option B (Defined CPU affinity):
for “-j” param select appropriate number of CPU cores available on your system.
In order to build standalone binaries (i.e. to upload it to the server where no dev packages installed), invoke:
Wait until compilation is finished (Approximately 21 minutes using AWS T2 Medium)
6. Copy binaries to the appropriate directory:
Option A (system scope) –
Option B (user scope) –
7. Run Graft network node
Under folder/GraftNetwork/build/release/bin, the following components may be found:
Running Graft network node daemon:
8. Creating CLI wallet and connecting to the local testnet node
To create new wallet for the public testnet, invoke:
File location :
It will try to connect to the local network node daemon, running in testnet mode, ask password for a new wallet, electrum seed language, generate new wallet, and finally open wallet with CLI interface. Invoke
sudo apt-get install -y git2. Clone Graft Network from GitHub repository:
https://github.com/graft-project/GraftNetwork.git
git clone https://github.com/graft-project/GraftNetwork.git3. Go to GraftNetwork directory:
cd GraftNetwork4. Install dependencies from the list https://github.com/graft-project/GraftNetwork#dependencies
Use the following command line:
sudo apt-get -y install build-essential cmake pkg-config libboost-all-dev libssl-dev libunwind8-dev liblzma-dev libldns-dev libexpat1-dev doxygen graphviz5. Start the build:
Option A (Use all CPUs):
makeOption B (Defined CPU affinity):
make -j4for “-j” param select appropriate number of CPU cores available on your system.
In order to build standalone binaries (i.e. to upload it to the server where no dev packages installed), invoke:
make -j4 release-staticWait until compilation is finished (Approximately 21 minutes using AWS T2 Medium)
6. Copy binaries to the appropriate directory:
Option A (system scope) –
sudo cp build/release/bin/* /usr/local/bin/Option B (user scope) –
mkdir $HOME/bincp build/release/bin/* $HOME/bin7. Run Graft network node
Under folder
graftnoded – Graft Network daemon;graft-wallet-cli – Graft Network CLI Wallet.Running Graft network node daemon:
graftnoded --testnet8. Creating CLI wallet and connecting to the local testnet node
To create new wallet for the public testnet, invoke:
./graft-wallet-cli --generate-new-wallet --testnet File location :
~/GraftNetwork/build/release/binIt will try to connect to the local network node daemon, running in testnet mode, ask password for a new wallet, electrum seed language, generate new wallet, and finally open wallet with CLI interface. Invoke
help to see available commands. E.g. CPU mining (solo mining) can be started with start_mining command.Installing CUDA (NVIDIA) Miner On Ubuntu Server 16.04/17
Add graphic apt repository;

Press “Enter” to continue

Update system packages ;

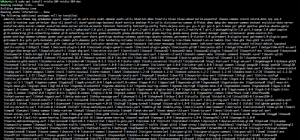
Install NVIDIA video driver (Installation may take up to 10 minutes to complete) ;
Reboot ;

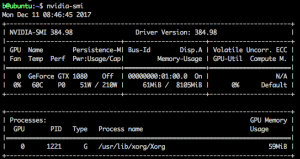
Verify driver installation, and that GPU is listed ;
Install required packges ;

Update packages;

Install GCC6;

Make CUDA0 folder ;

Go to CUDA9 Folder;

Download CUDA9 ;
 Give CUDA9 installation “run” permissions ;

Install CUDA9 ;
Press SPACE until EULA is complete
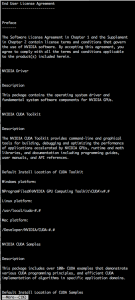 Type ; accept

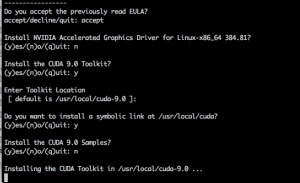
Do not install driver , press ; n

Install CUDA9 Toolkit , press; y

Use default location , press ; Enter

Create symbolic link , press ; y

Do not install samples , press ; y

Wait for installation to complete;
Add folder links ;

Add path for next boot cycle ;
Modify file by using VI ;

Get to bottom of file , press ; G
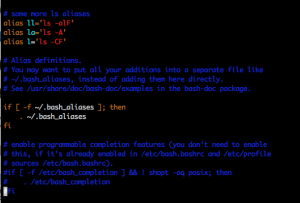
Add New lines , press ; o

Add new content to file (copy and paste text below ) ;

Exit Insert mode , press ;
Esc

Save and exit VI, press ;
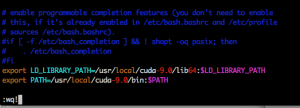
Press ; Enter

Reboot ;

Install additional packages ;

Install additional packages

Clone CCMINER Git repository;

Go to CCMINER folder;

Run CCMINER autogen;

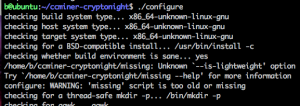
Run CCMINER configure;
Modify “Makefile” ;
Open “Makefile” in VI, excute ;

Search for ” NVCC_GENCODE”, type ;

Navigate to 3rd “NVCC_GENCODE” ( you may press “n” two time, or use arrows keys)

Delete record , type ; dd


Add new line above “all; cpuminer-config.h” , press ; O

Paste following ;

Exit insert mode , press : Esc
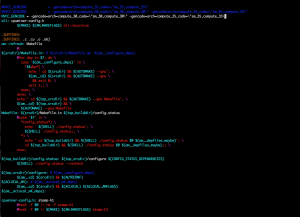
Search for “-abi=no” , run ;
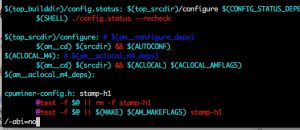
Press Enter

Delete from file , press x (Eight times );
 Exit and save file , run ;

Press Enter
Run “make ” ;

Run install ;

To Run miner , execute ;
Add graphic apt repository;
sudo add-apt-repository ppa:graphics-drivers/ppaPress “Enter” to continue

Update system packages ;
sudo apt update
Install NVIDIA video driver (Installation may take up to 10 minutes to complete) ;
sudo apt install nvidia-384 nvidia-384-dev -y
Reboot ;
sudo rebootVerify driver installation, and that GPU is listed ;
nvidia-smi
Install required packges ;
sudo apt-get install g++ freeglut3-dev build-essential libx11-dev libxmu-dev libxi-dev libglu1-mesa libglu1-mesa-dev -y
Update packages;
sudo apt-get update
Install GCC6;
sudo apt-get install gcc-6 g++-6 -y
Make CUDA0 folder ;
mkdir CUDA9Go to CUDA9 Folder;
cd CUDA9Download CUDA9 ;
wget https://developer.nvidia.com/compute/cuda/9.0/Prod/local_installers/cuda_9.0.176_384.81_linux-run Give CUDA9 installation “run” permissions ;
chmod +x cuda_9.0.176_384.81_linux-runInstall CUDA9 ;
sudo ./cuda_9.0.176_384.81_linux-run —overridePress SPACE until EULA is complete
 Type ; accept
Do not install driver , press ; n
Install CUDA9 Toolkit , press; y
Use default location , press ; Enter
Create symbolic link , press ; y
Do not install samples , press ; y

Wait for installation to complete;

Add folder links ;
sudo ln -s /usr/bin/gcc-6 /usr/local/cuda/bin/gcc

      sudo ln -s /usr/bin/g++-6 /usr/local/cuda/bin/g++
Add path for next boot cycle ;
Modify file by using VI ;
vi ~/.bashrcGet to bottom of file , press ; G

Add New lines , press ; o

Add new content to file (copy and paste text below ) ;
      export LD_LIBRARY_PATH=/usr/local/cuda-9.0/lib64:$LD_LIBRARY_PATH

      export PATH=/usr/local/cuda-9.0/bin:$PATH
Exit Insert mode , press ;
Esc

Save and exit VI, press ;
:wq!
Press ; Enter
Reboot ;
sudo rebootInstall additional packages ;
sudo apt-get install libcurl4-openssl-dev git build-essential libssl-dev -yInstall additional packages
sudo apt-get install autotools-dev autoconf libcurl3 libcurl4-gnutls-dev -yClone CCMINER Git repository;
git clone https://github.com/tsiv/ccminer-cryptonight
Go to CCMINER folder;
cd ccminer-cryptonight/Run CCMINER autogen;
./autogen.shRun CCMINER configure;
./configure
Modify “Makefile” ;
Open “Makefile” in VI, excute ;
vi ~/ccminer-cryptonight/MakefileSearch for ” NVCC_GENCODE”, type ;
/NVCC_GENCODE
Navigate to 3rd “NVCC_GENCODE” ( you may press “n” two time, or use arrows keys)
Delete record , type ; dd
Add new line above “all; cpuminer-config.h” , press ; O
Paste following ;
NVCC_GENCODE = -gencode=arch=compute_30,code=\"sm_30,compute_30\"-gencode=arch=compute_35,code=\"sm_35,compute_35\"Exit insert mode , press : Esc

Search for “-abi=no” , run ;
/-abi=no
Press Enter
Delete from file , press x (Eight times );
:wq!Press Enter
Run “make ” ;
makeRun install ;
sudo make install
To Run miner , execute ;
ccminer -a cryptonight -o stratum+tcp://[pool address] -u [wallet address] -p x
Windows Mining Guide
Extract driver, Click install.

Install Driver

Accept and Install

Select custom install
Uncheck the following options ; AMD Problem Report Wizard , AMD Radeon Settings , HDMI Audio Driver .

Reboot computer
Go to “device manager” , verify driver code ( as of Jan 2018 , latest release is 8/8/2017)

Download CUDA Driver; Extract driver,

Click Agree and continue

Select “custom” installation

Uncheck “NVIDIA GeForce Experience” and uncheck “Other components”

Click Next

Check “I Understand…” and click next.

Uncheck “always trust”, and click Install

Click Next

Click Restart now

Go to “device manager” and verify driver installed correctly ( Driver date 11/2/2017)

Installing XMR-Stak
Download latest XMR-Stak

Unzip XMR-Stak
Run xmr-stak
Enter the following ;
1. Currency
Monero
2. Pool Address
pooltest.graft.network:3333 (or any pool you would like to use)
3. Password
x
4. TLS/SSL
n (Depend on the pool you are using some pools will offer SSL/TLS function)
5. Nicehash
n
6. multiple pools
n (you can configure backup pools in this portion)

Wait for miner to start

Verify miner utilize GPU and/or CPU. This can be done by looking at the file list and varify XMR-Stak have create a file called “amd.txt” or “nvidia.txt”
Monitoring XMR-Stak
Web Interface for Monitoring
Search for “httpd_port” change port number to 80 ( or any other port) . Once completed you may view your miner statistic via http://127.0.0.1 ( on your local miner) or by accessing your miner IP address.


XMR Stak GPU configuration is done by a configuration file called AMD for AMD GPUs and NVIDIA for NVIDIA GPU`s . In order to remove/add/change configuration on how XMR STAK interact with the GPU`s the files will need to be modified.
Threads are number of parallel process the card is handling at once (multitasking). Most cards support and produce better results working 2 threads at a time. Threads can be changed or added in the GPU config file. Below is an example for a single AMD RX 580 using a single thread in compare to two threads ( all other settings are equal ) . Notice output increased by 20%+-
Single Thread:

Dual Thread;

Below is an example of the configuration change in the AMD file;
Single Thread :
Dual threads ;
** A GPU with two threads use the same “Index” **
Intensity is the “difficulty” of formula you assign to your card. You may play with this setting and try to go as high as possible. When going to high the results might be pixilation of the screen ( if you are using the same card for video output ) and/or crush or the OS or the GPU. In many cases this will vary on you GPU and also on the components which are inside your GPU ( such as memory chips ) . Remember that higher intensity will not always produce better results, you will have to try and see the best results for your specific cards, even with same GPU`s you will get various results .
Example 1;
AMD RX 580 with the following settings ;

Example 2;
AMD RX 580 with the following settings ;

Example 3 ;

CPU Affinity allow you to assign a specific GPU thread to a specific CPU core. This allow you to allocate resources to specific “area” within you processor. This is good when need to distribute many GPU threads while allowing normal OS operations. For example, if one have a CPU with two cores it will be best practice to assign GPU threads to core 1 , allowing core 0 to serve OS functions.
With no CPU affinity :
With CPU affinity :
While CPU mining is not as productive as GPU it can add up with hash rate. XMR-Stak allow you to mine via CPU by itself or with combination of CPU and GPU
During your first run of XMR-Stak a cpu.txt file will be created . The file will host all you configuration of CPUs.
Example of cpu.txt ;
You can control which cores will be used for CPU mining by modifying the file , for example , below you will notice only core 6,7 and 8 will be used for mining.
The reasoning behind it is that cores 0-1 are assigned to OS operations, while cores 2-5 are assigned as CPU affinity to GPU`s . It is not recommended to use same CPU core for CPU mining while assigning the CPU core for GPU affinity.
“cpu_threads_conf” :
** CPU in the example below is FX8370E **

0 – NVIDIA GTX 1080
1 – AMD 580 (Frist Thread)
2 – AMD 580 (Second Thread)
3- CPU core

amd.txt
nvidia.txt
cpu.txt
cpu.txt

Windows Mining Guide (Using XMR-Stak)
Installing Windows AMD Block Chain Driver
Download AMD Driver ;Extract driver, Click install.

Install Driver

Accept and Install

Select custom install
Uncheck the following options ; AMD Problem Report Wizard , AMD Radeon Settings , HDMI Audio Driver .

Reboot computer
Go to “device manager” , verify driver code ( as of Jan 2018 , latest release is 8/8/2017)

Installing Windows NVIDIA CUDA 9 Driver
Download CUDA Driver; Extract driver,

Click Agree and continue

Select “custom” installation

Uncheck “NVIDIA GeForce Experience” and uncheck “Other components”

Click Next

Check “I Understand…” and click next.

Uncheck “always trust”, and click Install

Click Next

Click Restart now

Go to “device manager” and verify driver installed correctly ( Driver date 11/2/2017)

Installing XMR-Stak
Download latest XMR-Stak

Unzip XMR-Stak
Run xmr-stak
Enter the following ;
1. Currency
Monero
2. Pool Address
pooltest.graft.network:3333 (or any pool you would like to use)
3. Password
x
4. TLS/SSL
n (Depend on the pool you are using some pools will offer SSL/TLS function)
5. Nicehash
n
6. multiple pools
n (you can configure backup pools in this portion)

Wait for miner to start

Verify miner utilize GPU and/or CPU. This can be done by looking at the file list and varify XMR-Stak have create a file called “amd.txt” or “nvidia.txt”
Monitoring XMR-Stak
Web Interface for Monitoring
Search for “httpd_port” change port number to 80 ( or any other port) . Once completed you may view your miner statistic via http://127.0.0.1 ( on your local miner) or by accessing your miner IP address.


GPU Mining
XMR-Stak can mine using AMD and NVIDIA GPU`s.XMR Stak GPU configuration is done by a configuration file called AMD for AMD GPUs and NVIDIA for NVIDIA GPU`s . In order to remove/add/change configuration on how XMR STAK interact with the GPU`s the files will need to be modified.
Threads are number of parallel process the card is handling at once (multitasking). Most cards support and produce better results working 2 threads at a time. Threads can be changed or added in the GPU config file. Below is an example for a single AMD RX 580 using a single thread in compare to two threads ( all other settings are equal ) . Notice output increased by 20%+-
Single Thread:

Dual Thread;

Below is an example of the configuration change in the AMD file;
Single Thread :
"gpu_threads_conf" : [

  // gpu: Ellesmere memory:2752

  // compute units: 36

  { "index" : 0,

    "intensity" : 864, "worksize" : 8,

    "affine_to_cpu" : false, "strided_index" : true

  },
],
Dual threads ;
"gpu_threads_conf" : [

  // gpu: Ellesmere memory:2752

  // compute units: 36

  { "index" : 0,

    "intensity" : 864, "worksize" : 8,

    "affine_to_cpu" : false, "strided_index" : true

  },

"gpu_threads_conf" : [

  // gpu: Ellesmere memory:2752

  // compute units: 36

  { "index" : 0,

    "intensity" : 864, "worksize" : 8,

    "affine_to_cpu" : false, "strided_index" : true

  },

],
** A GPU with two threads use the same “Index” **
Intensity is the “difficulty” of formula you assign to your card. You may play with this setting and try to go as high as possible. When going to high the results might be pixilation of the screen ( if you are using the same card for video output ) and/or crush or the OS or the GPU. In many cases this will vary on you GPU and also on the components which are inside your GPU ( such as memory chips ) . Remember that higher intensity will not always produce better results, you will have to try and see the best results for your specific cards, even with same GPU`s you will get various results .
Example 1;
AMD RX 580 with the following settings ;
"gpu_threads_conf" : [

  { "index" : 0,

    "intensity" : 940, "worksize" : 8,

    "affine_to_cpu" : false, "strided_index" : true

  },

  { "index" : 0,

    "intensity" : 1000, "worksize" : 8,

    "affine_to_cpu" : false, "strided_index" : true

  },

],

Example 2;
AMD RX 580 with the following settings ;
"gpu_threads_conf" : [

  { "index" : 0,

    "intensity" : 900, "worksize" : 8,

    "affine_to_cpu" : false, "strided_index" : true

  },

  { "index" : 0,

    "intensity" : 900, "worksize" : 8,

    "affine_to_cpu" : false, "strided_index" : true

  },

],

Example 3 ;
"gpu_threads_conf" : [

  { "index" : 0,

    "intensity" : 700, "worksize" : 8,

    "affine_to_cpu" : false, "strided_index" : true

  },

  { "index" : 0,

    "intensity" : 700, "worksize" : 8,

    "affine_to_cpu" : false, "strided_index" : true

  },

],

CPU Affinity allow you to assign a specific GPU thread to a specific CPU core. This allow you to allocate resources to specific “area” within you processor. This is good when need to distribute many GPU threads while allowing normal OS operations. For example, if one have a CPU with two cores it will be best practice to assign GPU threads to core 1 , allowing core 0 to serve OS functions.
With no CPU affinity :
"gpu_threads_conf" : [

  { "index" : 0,

    "intensity" : 700, "worksize" : 8,

    "affine_to_cpu" : false, "strided_index" : true

  },

  { "index" : 0,

    "intensity" : 700, "worksize" : 8,

    "affine_to_cpu" : false, "strided_index" : true

  },

],
With CPU affinity :
"gpu_threads_conf" : [

  { "index" : 0,

    "intensity" : 700, "worksize" : 8,

    "affine_to_cpu" : 1, "strided_index" : true

  },

  { "index" : 0,

    "intensity" : 700, "worksize" : 8,

    "affine_to_cpu" : 1, "strided_index" : true

  },

],
CPU Mining
XMR-Stak can mine using CPUWhile CPU mining is not as productive as GPU it can add up with hash rate. XMR-Stak allow you to mine via CPU by itself or with combination of CPU and GPU
During your first run of XMR-Stak a cpu.txt file will be created . The file will host all you configuration of CPUs.
Example of cpu.txt ;
"cpu_threads_conf" :

[

    { "low_power_mode" : false, "no_prefetch" : true, "affine_to_cpu" : 0 },

    { "low_power_mode" : false, "no_prefetch" : true, "affine_to_cpu" : 1 },


],
You can control which cores will be used for CPU mining by modifying the file , for example , below you will notice only core 6,7 and 8 will be used for mining.
The reasoning behind it is that cores 0-1 are assigned to OS operations, while cores 2-5 are assigned as CPU affinity to GPU`s . It is not recommended to use same CPU core for CPU mining while assigning the CPU core for GPU affinity.
“cpu_threads_conf” :
[

{ "low_power_mode" : false, "no_prefetch" : true, "affine_to_cpu" : 6 },

{ "low_power_mode" : false, "no_prefetch" : true, "affine_to_cpu" : 7 },

{ "low_power_mode" : false, "no_prefetch" : true, "affine_to_cpu" : 8 },

],
** CPU in the example below is FX8370E **

Combo Mining (CPU , AMD and NVIDIA)
As stated before XMR-Stak allow you to mine with various component. Below is an example for a setup which use RX 580 , GTX 1080 and CPU .0 – NVIDIA GTX 1080
1 – AMD 580 (Frist Thread)
2 – AMD 580 (Second Thread)
3- CPU core

amd.txt
"gpu_threads_conf" : [

  { "index" : 0,

    "intensity" : 900, "worksize" : 8,

    "affine_to_cpu" : false, "strided_index" : true

  },

  { "index" : 0,

    "intensity" : 900, "worksize" : 8,

    "affine_to_cpu" : false, "strided_index" : true

  },

],
nvidia.txt
"gpu_threads_conf" :

[

  // gpu: GeForce GTX 1080 architecture: 61

  //      memory: 6762/8192 MiB

  //      smx: 20

  { "index" : 0,

    "threads" : 22, "blocks" : 60,

    "bfactor" : 6, "bsleep" :  25,

    "affine_to_cpu" : false, "sync_mode" : 3,

  },

],
cpu.txt
"cpu_threads_conf" :

[

    { "low_power_mode" : false, "no_prefetch" : true, "affine_to_cpu" : 1 },

],
If for any reason you do not wish XMR-Stak to mine using a specific CPU or GPU , remove the text from the file . In the example below i do not wish to mine using CPU , as i am using a very old CPU it does not produce much Hs and hence there is no point running it . In this case i have cleared the settings from “cpu.txt” and started XMR-Stak.
cpu.txt
"cpu_threads_conf" :
[

],

Connect to the network at your own risk:
Access to the public GRAFT blockchain networks (currently – mainnet, testnet, rta-testnet) is granted without any warranties of any kind, and GRAFT team disclaims all implied warranties of merchantability or fitness for a particular purpose. By accessing the networks, you agree to accept responsibility for any liability arising from your use of the networks.


